
The icebox cake has been around since the 1920s, born when refrigerators were still a novelty and food companies were printing recipes on packaging to convince people their new appliance was indispensable. Nabisco introduced their Famous Chocolate Wafers in 1924 and by 1929 the icebox cake recipe was printed right on the box — one of the earliest examples of a corporation creating a recipe tradition that became genuinely beloved across generations. A century later the magic is unchanged: layers of cream and biscuits left overnight soften into something that slices cleanly and tastes far more impressive than the effort involved.
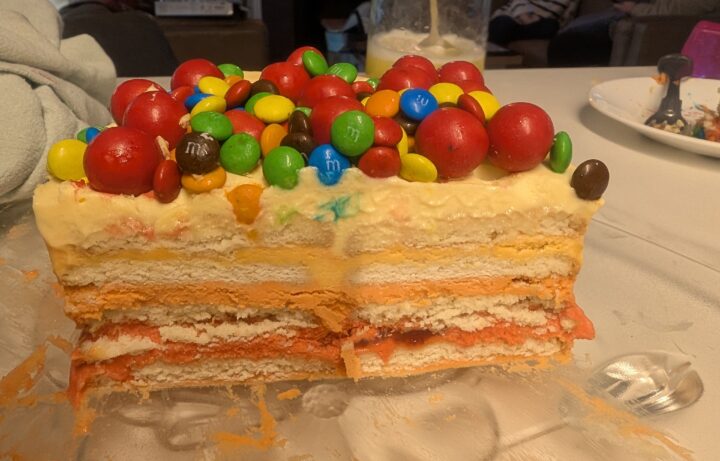
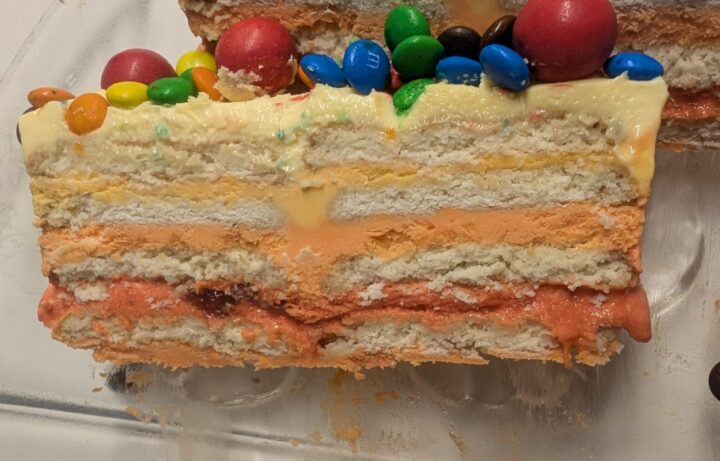
This version adds a reveal. Whoever the cake is for chooses their own colours, you layer them up, and the cross-section does all the talking the moment it’s cut. Brilliant for a birthday, brilliant to make with kids, and completely make-ahead — including freezer-friendly if you want to get ahead by days rather than hours.
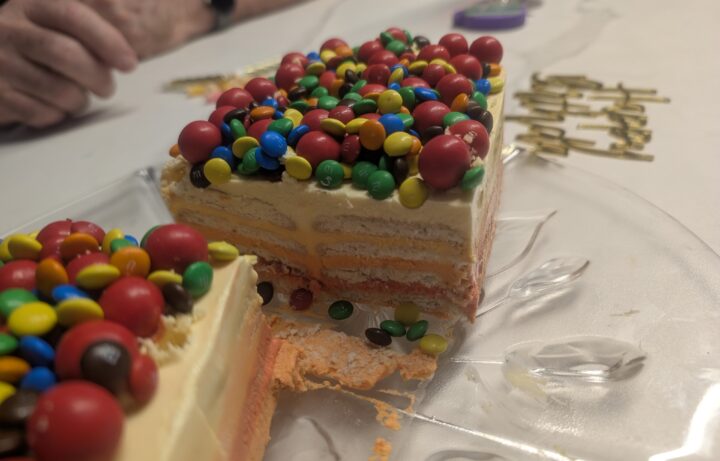
ICEBOX REVEAL CAKE
Ingredients
- 500g cream cheese, softened to room temperature
- 1 x 395g tin sweetened condensed milk
- 100ml thick kefir (or 100ml thickened cream)
- 1 tsp vanilla extract
- Zest of 1 lemon (for yellow layers)
- Zest of 1 orange (for orange layer)
- 3–4 tbsp lemon curd or strawberry jam (for pink layer)
- Gel food colours in your chosen palette — we used lemon yellow, bright yellow, orange and deep pink
- 1½ packets Nice or Marie biscuits (375g)
- M&Ms, Smarties, Jaffas or your choice of lollies to decorate
Method
- Remove the cream cheese from the fridge at least an hour before you start — it needs to be properly softened or the mixture will be lumpy.
- Beat the cream cheese in a stand mixer until completely smooth. Add the condensed milk, kefir and vanilla and beat until fully combined. The mixture will be soft and pourable at this stage — this is correct. It sets firm overnight in the fridge.
- Weigh the mixture and divide into four portions. The top decorative layer needs to be the most generous — roughly 40% of the total, or about 375g. The three inner layers share the remainder at approximately 185g each. Weigh directly into separate bowls.
- Add gel colours to each bowl and stir through with a spoon. Having all four bowls in front of you lets you compare and adjust before committing — add more colour to any bowl that needs it. For the lemon top layer: add lemon yellow gel plus the lemon zest. For the bright yellow inner layer: more yellow plus extra lemon zest. For the orange layer: orange gel plus the orange zest. For the pink bottom layer: red or pink gel, plus lemon curd or jam folded in loosely.
- Line an 11 x 30cm springform loaf tin with baking paper on the base, locked in place with the springform clip. No cling film needed.
- Spread a thin smear of the lemon yellow cream across the base to anchor the first biscuit layer.
- Lay biscuits in a single layer across the base, breaking pieces to fill any gaps. The biscuits will be slightly wider than the tin — break to fit.
- Spread the pink layer evenly over the biscuits.
- Add a second layer of biscuits.
- Spread the orange layer.
- Add a third layer of biscuits.
- Spread the bright yellow layer — keep this one thinner than the others.
- Add a fourth and final layer of biscuits.
- Finish with the lemon yellow cream spread generously across the top and smoothe flat. This is your decorative surface.
- Cover the tin tightly and refrigerate overnight — a minimum of 12 hours. The biscuits need the full time to absorb moisture from the cream and soften to that tender, cake-like texture.
- After the overnight rest, transfer the tin to the freezer for at least 2 hours before serving. This firms the cake for clean slicing and gives it an ice cream cake texture at the table.
- Remove from the freezer 30 minutes before serving. Release the springform, lift away the sides, slide off the base and place on a board. Add your lolly decorations after the surface has softened a bit — wait, not before.
- Cut with a cleaver or heavy sharp knife, straight down. No sawing. The frozen layers need a firm single cut for clean results.
Notes
The condensed milk replaces both the thickened cream and icing sugar from earlier versions of this recipe. It sets firmer, makes the method simpler, and the flavour is closer to the classic no-bake cheesecake that icebox cakes have always been related to. The kefir adds a tang that stops the sweetness being one-dimensional — don’t skip it if you don’t have it then some yoghurt will substitute.
Each layer works best when colour and flavour are matched. Lemon zest in the yellow layers, orange zest in the orange layer, and lemon curd or jam in the pink layer gives the cake a flavour reveal alongside the visual one. Jam alone needs to be used generously (3–4 tablespoons) to make an appreciable difference but makes the layer quite runny — lemon curd sets more firmly and delivers more concentrated flavour.
Gel food colours stain — hands, bench, bowls and spoons. Have a damp cloth ready and don’t wear anything you care about. The bowl method (weigh first, colour separately, compare before committing) is far more flexible than colouring the whole batch sequentially.
Any plain sweet biscuit works. Nice biscuits add a subtle coconut note; Marie or Milk Arrowroot are neutral if you want the cream flavours to lead. You will need 1½ standard packets (375g) for a full 11 x 30cm tin.
The timing sequence matters: overnight fridge to soften the biscuits, then at least 2 hours in the freezer to firm for slicing, then 30 minutes on the bench before serving. Don’t shortcut the fridge stage — the freezer alone won’t soften the biscuits.
The colours are entirely up to whoever the cake is for. Let the birthday person choose their own palette — it makes the reveal genuinely theirs.
For a decidedly grown-up version layered with Biscoff biscuits, liqueur-spiked cream and shaved chocolate, see A Very Adult Icebox Cake.
no-bake, icebox cake, birthday cake, kids baking, make ahead, freezer friendly, layered dessert, cream cheese, condensed milk, party dessert, ice cream cak