Mung Bean Sprout Master Guide & Weekly Recipes
The Sprouting Method
- The Prep & Soak (Day 1): Rinse 1/2 cup of dry mung beans. Submerge in cool water for 8–12 hours until skins just start to crack. If you’re inclined rinse them a few times during the day.
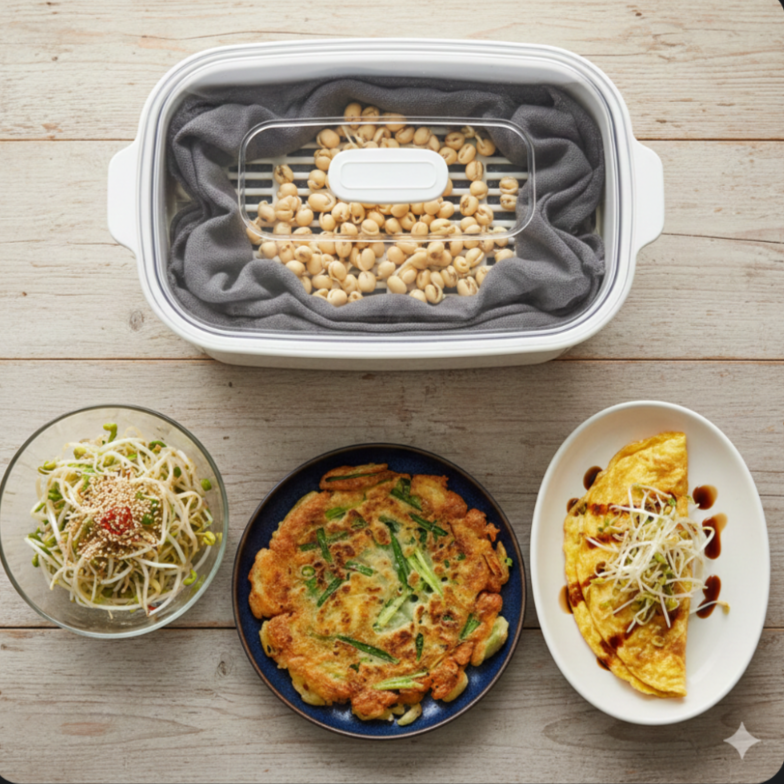
- The Setup (Day 2): Drain and spread beans evenly across your tray’s grate.
- Cover and Weight them down: Quadruple-fold a dark tea towel, dampen it, and lay it directly on top of the beans. This “stresses” the sprouts, forcing them to grow thick and crunchy. Cover with a lid for total darkness.
- The Growing Cycle (Days 2–6): Pour cool water over the tea towel twice daily. Drain the reservoir each time.
- The Harvest: Lift the grate and slice a sharp knife across the underside to remove the roots in one sheet. Discard roots. (Chooks love them)
- The Cold Shock: Dunk sprouts in ice-cold water. Swish to let green hulls float to the top; skim and discard as many as want to be gone but don’t obsess over it.
The “Deep Soak” Float Method – Prepare a large basin: Fill a large bowl or your clean kitchen sink with cool water. You want plenty of room for the sprouts to move freely.Submerge and swirl: Place the sprouts in the water. Gently use your hands to swish them around in a circular motion. This agitation loosens the husks from the stems.
- The separation: Most of the green husks will either float to the surface or sink to the very bottom, while the sprouts tend to hover in the middle.
- Skim the top: Use a small strainer or your hand to skim off the floating husks and discard them.
- The “Lift and Shake”: Gently lift handfuls of sprouts out of the water, giving them a little shake to let any trapped husks fall back into the basin.
- Final Rinse: Transfer the cleaned sprouts to a colander and give them one last spray with cool water.
- Tips for Efficiency
Don’t overfill: Work in batches if you have a massive amount. If the water is too crowded, the husks get trapped between the sprouts and can’t float away.
Dry thoroughly: If you aren’t eating them immediately, make sure they are very dry before storing. A salad spinner is excellent for this, as wet sprouts spoil quickly in the fridge.
- Accept perfection is hard: Don’t stress about getting every single one. A few remaining husks are perfectly edible and won’t ruin a dish!
- The Storage: Spin or air-dry until bone dry. Lay out on a tea towel in the light for about an hour to complete the drying. Store in a sealed container lined with paper towels (top and bottom) in the coldest part of the fridge. Turn the whole container over regularly. If the paper gets too damp then change it. They should last a week.
Ways to Use the Weekly Harvest
Crispy Edge Mung Bean Pancake
Inspired by Korean Bindaetteok—use your pantry staples for the perfect crunch.
- The Batter: Whisk 1/2 cup flour, 2 tbsp corn flour (for extra crispiness), and a pinch of salt with enough water to make a thick paste.
- The Filling: Stir in a large handful of fresh sprouts and some chopped garlic chives.
- The Cook: Fry in a generous amount of oil over medium-high heat until the edges are golden-brown and lacy.
5-Minute Sprout Omelette
A light, crunchy breakfast that feels like a gourmet cafe meal.
- The Prep: Whisk 2 eggs with a splash of milk (or a teaspoon of your milk powder mixed with water for richness).
- The Cook: Pour eggs into a hot buttered pan. When the bottom is set, pile a big handful of fresh sprouts and a dash of soy sauce on one half.
- The Finish: Fold over and cook for just 30 seconds more. The sprouts should stay warm but keep their raw “snap.”
Sesame Salad
Perfect for a quick lunch or a side dish.
- The Base: 2 cups of fresh mung bean sprouts (blanch them in boiling water for 30 seconds if you prefer them softer, then shock in cold water).
- The Dressing: Mix 1 tbsp soy sauce, 1 tsp sesame oil, a pinch of sugar, and a squeeze of lemon.
- The Topping: Toss everything together and top with toasted sesame seeds or chili flakes.
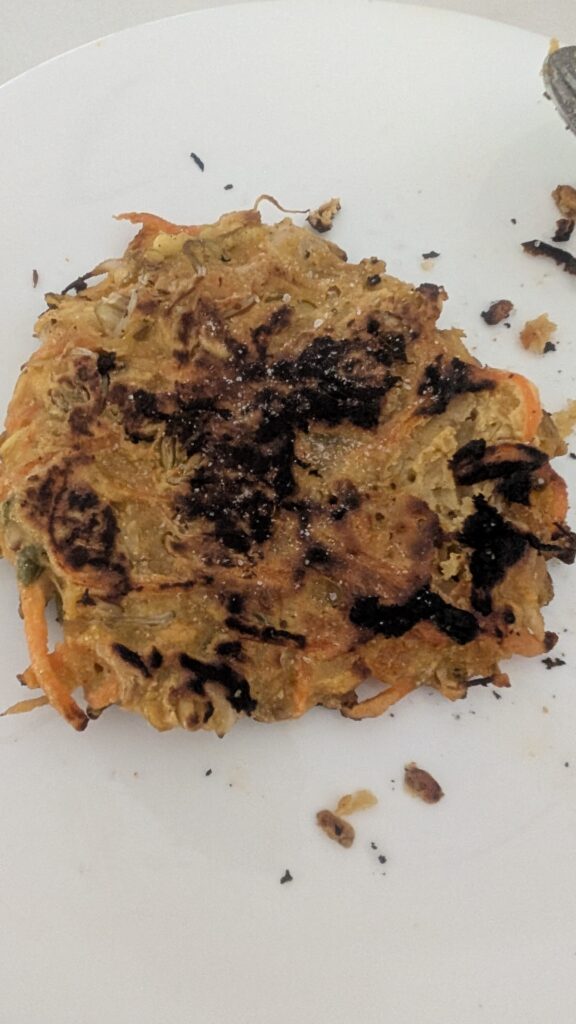
Crispy Mung Bean Sprout & Asian Slaw Fritters
Why You’ll Love These Fritters
* Uses Up Sprouts: The ideal solution for when you’ve sprouted a little too much!
* Flavour Packed: Thanks to the Asian slaw, these fritters are bursting with savory, tangy notes.
* Crispy & Tender: A golden-brown exterior gives way to a tender, veggie-filled interior.
* Naturally Gluten-Friendly: Made with chickpea flour, they’re a great option if you’re avoiding gluten.
* Quick & Easy: Once your ingredients are prepped, these come together in a flash.
Ingredients
* 3 cups (approx. 300g) fresh mung bean sprouts
* 2 cups (approx. 200g) Asian-style slaw, well-drained (see notes) or any slaw that’s hanging around!
* ½ cup chickpea flour (besan)
* 1 large egg
* 2 spring onions (scallions), thinly sliced
* 1 tablespoon soy sauce (or tamari for gluten-free)
* ½ teaspoon sesame oil
* ¼ teaspoon white pepper (optional, but recommended)
* Pinch of chilli flakes (optional, to taste)
* Salt to taste (you might not need much if your slaw is salty)
* Vegetable oil or other neutral oil for frying
Equipment
* Large mixing bowl
* Colander
* Clean tea towel or paper towels
* Large non-stick frying pan or griddle
* Spatula
Method
- Prep Your Sprouts: Give your mung bean sprouts a quick rinse. For slightly softer sprouts and to ensure they cook evenly, you can blanch them: Plunge them into boiling water for 30-60 seconds, then immediately drain and transfer to an ice bath to stop the cooking. Drain them very, very well afterward, patting dry with a clean tea towel.
- Drain the Slaw: This step is crucial! Place your Asian-style slaw in a colander. Press down firmly with the back of a spoon or even your hands to squeeze out as much liquid as possible. For best results, transfer the drained slaw to a clean tea towel and squeeze firmly to remove excess moisture. The drier it is, the crispier your fritters will be!
- Combine Ingredients: In your large mixing bowl, combine the thoroughly drained mung bean sprouts and Asian-style slaw. Add the sliced spring onions.
- Add Binders & Seasoning: Sprinkle in the chickpea flour. In a separate small bowl, lightly whisk the egg and add it to the vegetable mixture. Pour in the soy sauce, sesame oil, white pepper, and chilli flakes (if using).
- Mix the Batter: Mix everything together with a spoon or your hands until well combined. The mixture should be moist enough to hold together when pressed, but not overly wet or runny. If it seems too wet, add another tablespoon or two of chickpea flour. If too dry, add a tiny splash of water (but this is unlikely if your egg is large). Taste a tiny bit of the mixture and adjust salt if needed – remember the slaw likely has some seasoning already.
- Heat the Pan: Place your non-stick frying pan over medium heat. Add enough oil to generously coat the bottom of the pan, about 2-3 tablespoons. Let it get hot – a drop of batter should sizzle immediately.
- Form & Fry: Scoop about ¼ cup of the mixture per fritter (or your desired size). Carefully place it into the hot oil. Use the back of your spatula to gently flatten it into a disc, about 1-1.5 cm thick. Don’t overcrowd the pan; cook in batches if necessary.
- Cook Until Golden: Cook for 3-5 minutes per side, or until deeply golden brown and crispy. Ensure they are cooked through. You might need to adjust the heat as you go to prevent burning.
- Serve: Transfer the cooked fritters to a plate lined with paper towels to absorb any excess oil. Serve hot with your favourite dipping sauce – a simple mix of soy sauce, rice vinegar, and a dash of sesame oil is perfect, or try a sweet chilli sauce!