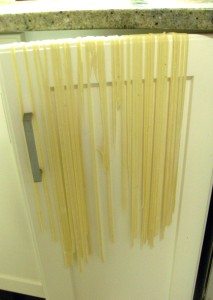
Hanging pasta on cupboard door to dry
Yesterday I got out the pasta machine to make flat bread. It hadn’t been out of the cupboard in several years and I had forgotten how easy it was to use and how well it kneaded dough. Today I heard Italian food being discussed on the radio and the recipe for pasta was given. Last time I made my own pasta I ended up with strands all over the kitchen all stuck together, and I didn’t think it tasted all that good. This time I made a small quantity and served it as a side with garlic, olive oil and a small amount of cheese. It was absolutely beautiful.
Ingredients
This serves about 6, can be halved for 2/3 serves
- 300g plain flour (00 flour if available)
- 5g salt
- 180g eggs – probably 3 eggs and 2 yolks
- Semolina or polenta for tossing the strands in. After being dusted with semolina the dough can be swirled into nests. Much easier than hanging off a stand or cupboard doors. The semolina comes off as the pasta is cooked.
Method
- Weigh the ingredients into a bowl and stir together.
- Pour the mix into the food processor (a dough blade on the mixer works but this dough is pretty dry and tends to go around in a clump) and process for a minute or so until all the ingredients are somewhat together.
- Remove the dough onto a floured surface and bring it together, pressing and folding to form a disk.
- Rotating and pressing the disk, knead for about 10 minutes.
- Wrap the dough disk in plastic wrap and leave for and hour to rest.
- After resting, open the disk of dough up, knead briefly, divide into 2 disks and cut each one into quarters. Flour them well. Cover with plastic wrap while preparing for forming and rolling.
- Set up the pasta machine or the Kitchen Aid attachment and open the wheel to the widest setting.
- Take one of the dough segments and flatten it out on a floured surface with a rolling pin. Run the piece of dough through the machine, folding and rotating and repeating and working down to narrower settings.
- Add flour to both sides of the pieces as necessary.
- Attach the slicing wheel and run the pieces through, catching the strips and either hang them over cupboard doors to dry or have some polenta or semolina and flour on the bench and swirl the pasta strips through it to coat. They can be wound up into lose nests and left in piles on the bench.
Cooking
- Bring a large pot of water to the boil, adding 1 tbsp salt per litre. Add the pasta and cook for approximately 3 minutes. Drain into a seive and reserve the cooking water to use to moisten the pasta.
- This is so tasty – it is best eaten tossed with garlic, olive oil and a small amount of parmesan cheese.
- Another alternative is to get a glass dish and squish a layer of butter, parmesan and olive oil on the bottom, some dried sage, salt and pepper mixed with the butter add to the flavour. Scoop the hot pasta into the bowl and stir to coat evenly.
Boscaiolo
- For a boscaiolo cook the chopped bacon, drain off some of the oil and add some chopped mushrooms, continue cooking until wilted. Set aside until the pasta is ready.
- Whisk up a couple of egg yolks .
- Make up the pasta as above, stirring the hot pasta into the butter /oil mix, then add the egg yoks and stir, then fold through the bacon and mushrooms and serve with parsley, black peppper and extra parmesan.
HOW TO DO IT WITH A KITCHEN AID AND PASTA ATTACHMENTS – VIA Gemini AI
Standard Egg Pasta Dough for KitchenAid (Serves 4)
Ingredients:
* 300 grams Italian “00” flour (or good quality all-purpose flour)
* 180-185 grams whole large eggs (weighed for accuracy – usually 3 large eggs + 1 large egg yolk)
* Pinch of fine sea salt (optional, about 2-3 grams)
Equipment:
* KitchenAid Stand Mixer
* Mixing bowl for the KitchenAid
* Flat beater attachment
* Dough hook attachment
* KitchenAid Pasta Roller attachment (essential for rolling sheets)
* KitchenAid Pasta Cutter attachment(s) (e.g., fettuccine, spaghetti, or others)
* Plastic wrap
* Kitchen scale
* Light dusting of semolina flour or all-purpose flour for dusting
Instructions for Making the Dough with the KitchenAid:
* Combine Ingredients: Attach the mixing bowl to your KitchenAid stand mixer. Add the 300g of flour to the bowl. Make a slight well in the center of the flour (just a small indentation, not a deep well like you would for hand mixing). Crack the weighed eggs into the well, and add the pinch of salt.
* Initial Mixing (Flat Beater): Attach the flat beater to your stand mixer. Start on speed 2 and mix until the ingredients just start to come together and form a shaggy, crumbly mixture. This will take about 30 seconds to a minute.
* Kneading (Dough Hook): Remove the flat beater and attach the dough hook. Turn the mixer to speed 2 and knead for 5-7 minutes. The dough will initially look crumbly, but it will gradually come together into a smooth, elastic ball that cleans the sides of the bowl.
* Troubleshooting:
* Too Sticky: If the dough is too wet and sticks excessively to the bottom of the bowl, add flour, 5 grams at a time, until it comes together.
* Too Dry: If the dough isn’t coming together and remains very crumbly, add water, 1 teaspoon at a time, until it forms a cohesive ball. The ideal dough should be firm but pliable, not sticky.
* Rest the Dough: Once kneaded, remove the dough from the bowl. Form it into a ball, wrap it tightly in plastic wrap to prevent it from drying out, and let it rest at room temperature for at least 30 minutes (up to an hour). This resting period is crucial for the gluten to relax, making the dough much easier to roll thinly.
Instructions for Rolling and Cutting Pasta with KitchenAid Attachments:
* Prepare for Rolling:
* Cut the rested dough into 3-4 equal-sized portions. Keep any portions you’re not immediately working with wrapped in plastic wrap to prevent them from drying out.
* Lightly dust your work surface and the pasta sheets with semolina flour or regular flour as you go to prevent sticking.
* Attach Pasta Roller: Secure the pasta roller attachment into the power hub on the front of your KitchenAid stand mixer. Tighten the hub knob to secure it.
* Flatten and Roll:
* Set the pasta roller to its widest setting (usually 1).
* Turn your stand mixer to speed 2.
* Take one piece of dough and flatten it slightly with your hands so it fits through the roller opening.
* Feed the dough through the widest setting.
* Fold the rolled dough in half and feed it through again on the same widest setting. Repeat this process 2-3 times. This “kneads” the dough further and helps create a smooth, consistent sheet.
* Lightly dust the dough with flour if it starts to feel sticky.
* Progressively Thin the Dough:
* Without folding the dough, change the roller setting to the next thinnest setting (e.g., from 1 to 2).
* Feed the dough through the roller.
* Continue this process, increasing the roller setting one number at a time, until you reach your desired thickness. For most pasta shapes, settings 5 or 6 are a good starting point. For very thin pasta like cappellini, you might go up to 7 or 8.
* You’ll notice the dough getting longer and thinner with each pass. If the sheet gets too long to handle easily, cut it in half.
* Do not fold the dough once you start thinning it; only fold on the initial widest setting.
* Lay the rolled pasta sheets on a lightly floured surface or a pasta drying rack as you finish them.
* Attach Pasta Cutter (Optional):
* Once you have your pasta sheets rolled to the desired thickness, remove the pasta roller attachment.
* Secure your chosen pasta cutter attachment (e.g., fettuccine or spaghetti cutter) into the power hub.
* Cut the Pasta:
* Turn the mixer to speed 2.
* Carefully feed the rolled pasta sheets through the cutter. The machine will do the work of cutting the noodles.
* As the noodles emerge, gently catch them and lay them on a lightly floured surface, a pasta drying rack, or directly into boiling water if cooking immediately.
* If making nests, lightly dust them with flour to prevent sticking.
Tips for Using Your KitchenAid Pasta Attachments:
* Work in Batches: Don’t try to roll out the entire dough ball at once. Divide it into manageable pieces.
* Keep Dough Covered: Always keep the dough you’re not actively working with covered with plastic wrap to prevent it from drying out.
* Flour, Flour, Flour (Lightly!): Dust your dough and work surface lightly with flour throughout the rolling and cutting process to prevent sticking. Too much flour can make the pasta dry, so use just enough to prevent tackiness. Semolina flour is excellent for this.
* Speed Setting: Speed 2 is generally recommended for both rolling and cutting with the KitchenAid attachments.
* Don’t Force It: Let the machine do the work. If the dough isn’t feeding smoothly, adjust the flour/water slightly or re-roll on a thicker setting first.
* Cleaning: The attachments are typically not dishwasher safe. Use the cleaning brush that comes with them to remove any dried dough. Let any residual dough dry thoroughly on the attachments before brushing them clean.
Enjoy your fresh homemade pasta!